


Mauser 45acp conversion
The rebuilding and modification of the Mauser into a 45acp carbine is easy and fun. Again I have chosen to use common tools found in most homes. There are more pictures coming soon as well as a trouble shooting section.
Step one
| Install the adapter into the mag well and mark the ridges where the magazine release button will hit the mag well. Now use a Dremmel and grind the material away. Once you are done with the Dremmel, use a file to make the edges clean. Insert the magazine catch into the adapter and see if the button hits the mag well, if it does grind some more away until the button pushes from side to side easily. | |
| Now drill some holes for the retaining pins. Use a high quality 3/16 inch drill bit. You can use a drill press but that is a lot of set up time. Just use a hand drill. Mark 3 spots for 3 holes to be drilled. Drill one hole and then insert a pin, then drill another and inset that pin, repeat. Add a bit of WD40 to keep the aluminum from gumming up the bit. | |
| Once all the pins are installed, trim any excess off with a Dremmel and file. Make sure the converted trigger guard will still fit in the stock. | |
Step two
| File the receiver magazine rails, just trim around 2 millimeters on both sides near the front of the receiver. This is so the fat 45acp cartridge can easily slide up into the chamber area. Here is view from the top | 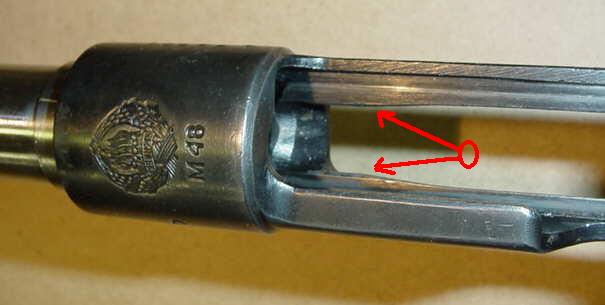 |
| Here is a view from the bottom. |  |
Step three
| Install the barrel and headspace. This is not as hard as it sounds on a bolt action. For installing the barrels, I use a vise with 2 blocks of wood. The wood has a channels cut into it for the barrel. I start by wrapping the barrel with a paper towel and place the wood blocks around it, then place those into a vise. Now install the receiver wrench and tighten the barrel all the way on. NOTE: the vise in the pic is not bolted down, it will flop all over the place. | 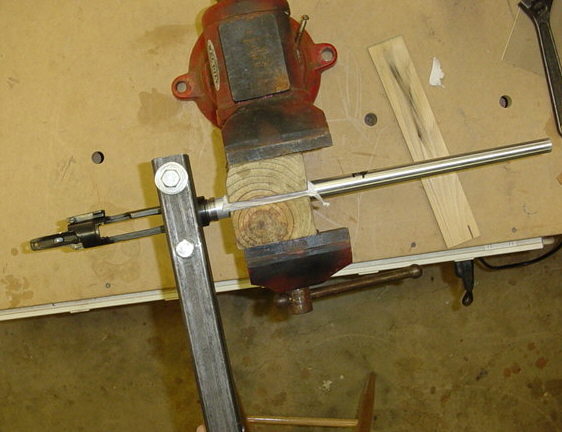 |
| Now check the headspace, install the bolt with the extractor removed. Start with a go-gauge. If it inserts and the bolt fully closes with ease then you good on that. Now use a no-go gauge, it the bolt again closes then you have a problem, the chamber is too far fore-ward. You will have to pull the barrel off and file or use a lathe to remove some material from the back and reinsert the barrel all the way and repeat the headspace procedure. Do this until the bolt closes fully on the go gauge but not on the no-go gauge. |
Step four
| reassemble the rifle, start with the sights. If you are going to use the old M48 or any iron sights you will need to solder the on with a low temp solder. NEVER QUENCH A BARREL after soldering a sight on. Align the sights by placing the receiver and barrel on blocks on a level surface. Mark them and then solder them on. If you do not want to mess with the solder try using metal epoxy made by "LOCTITE" | |
| If you are using the old Mauser stock then you will need to shorten it some. Use a saw to cut the front section down. I cut mine so there is enough material for the original bottom band. I then insert a brass thingy with glue so that I can mount the bayonet stud on the front. | 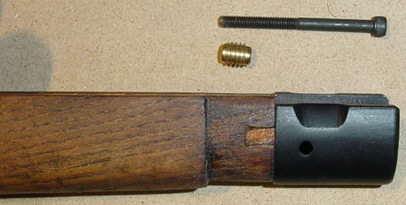 |
 |
|
| Now install the stock and hand guard and put the whole thing together again. |
| Modify the magazine. Just take some needle nose pliers and
bend the front tip of the magazine follower so that is will not catch on
the vent holes on the bottom of the bolt.
It is bent just a little bit. Also, this is not necessary for the higher quality magazines. |
 |
| Installing the magazine catch. Every manufacture has different dimensions on the magazine catch. The best seem to be those made by McCormick. Those still need the main part sanded some before they will operate smoothly. | pic soon |
| Fine tuning the action, you may want to scallop the stock
area around the magazine catch to make it easier to push. The one in the
picture was done with a Dremmel and then sanded over.
|
 |
| Fine tuning the feeding. You may find that your rifle feels
very tight when trying to close the bolt with a round. You can adjust this
by backing out the front screw on the trigger guard.
|
 |
THE END... for now.